ONNX Unleashed: Training and Optimizing BERT Models for Streamlit Web Apps
Learn to quantize and deploy your Deep Learning model with ONNX.
December 8, 2024

Introduction
In this article, I want to accomplish something very simple: build a web app that recognizes an emotion given a sentence. In doing this though we will see how to train a transformer-based model, convert it to ONNX format, quantize it, and run it from the frontend using Streamlit.
You can tun the following scripts using Deepnote: a cloud-based notebook that’s great for collaborative data science projects, and good for prototyping.
Optimizing the model with techniques such as quantization may be a good idea if we can maintain good performance, as it will improve the response speed, and we can create a product with lower latency and ensure greater user satisfaction.
We use a BERT-based model for emotion detection: anger, fear, joy, love, sadness, and surprise.
This is a model released by Microsoft, which is a distilled version of BERT.
- model: https://huggingface.co/microsoft/xtremedistil-l6-h256-uncased
- dataset: https://huggingface.co/datasets/dair-ai/emotion
We will heavily use the hugging face APIs to train this model on this dataset.
Model Training
Let’s start by installing the needed libraries. We are going to use a lot of the transformers and ONNX ones.
!pip install transformers[torch]
!pip install datasets  onnx onnxruntime
!pip install accelerate -U
All the imports we need:
from datasets import load_dataset
from transformers import AutoTokenizer
import torch
from transformers import AutoModelForSequenceClassification
import numpy as np
from datasets import load_metric
from transformers import TrainingArguments
from transformers import Trainer
import transformers
import transformers.convert_graph_to_onnx as onnx_convert
from pathlib import Path
import onnxruntime as ort
from onnxruntime.quantization import quantize_dynamic, QuantType
import numpy as np
from google.colab import files
I chose a BERT-based model distilled by Microsoft because it's lighter than its original version.
model_name = 'microsoft/xtremedistil-l6-h256-uncased'We obviously need some data to fine-tune our model. We can use the emotion dataset that can be found on the HuggingFace platform.
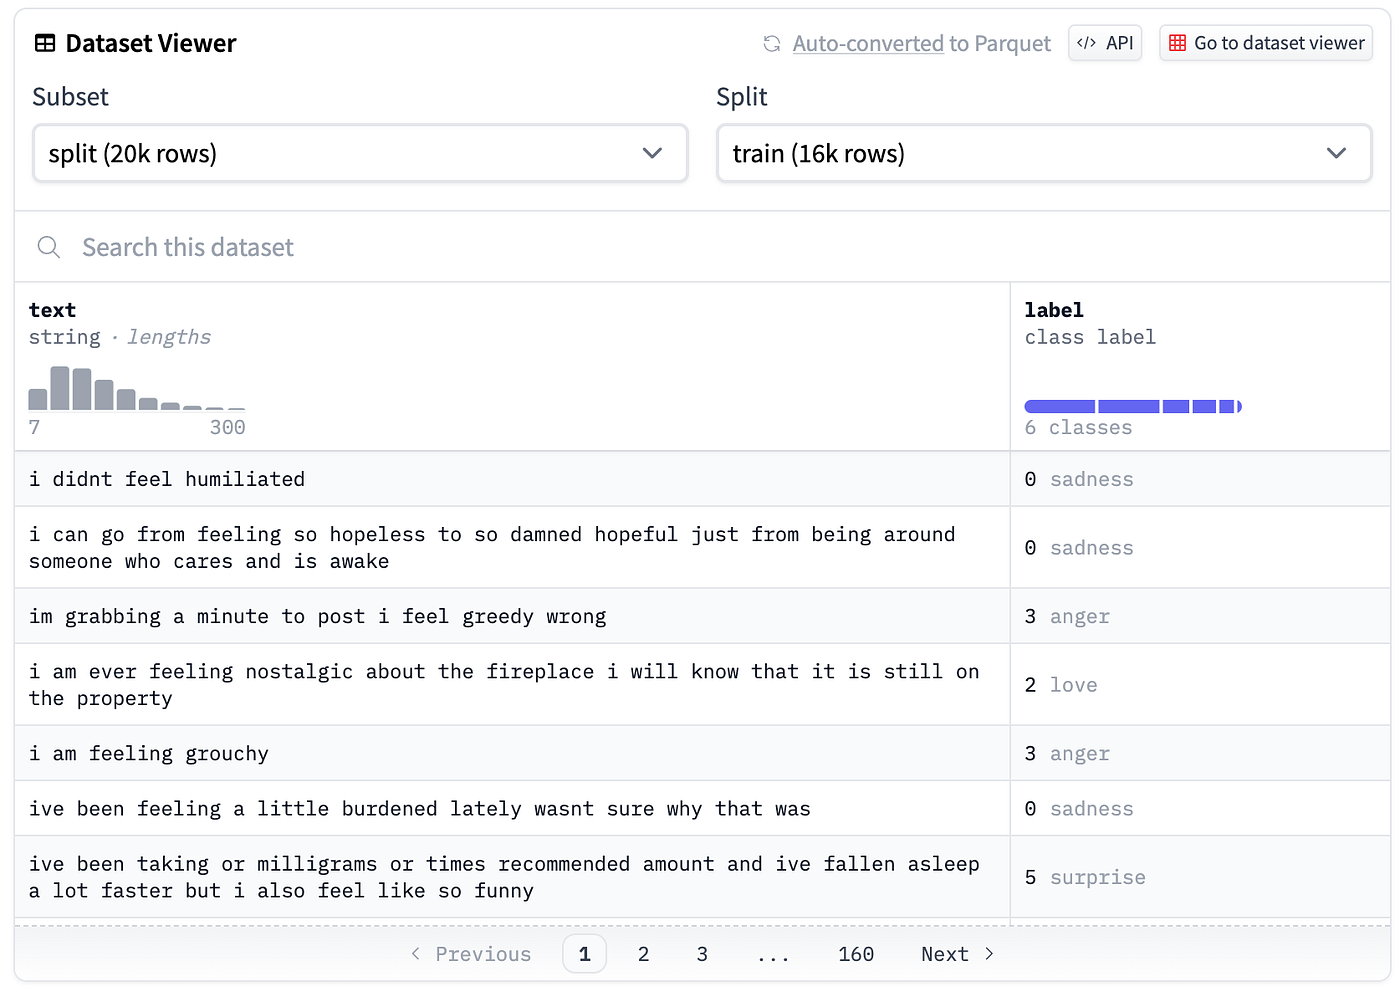
This dataset has a total of 20,000 examples split into train, validation and split
As usual, we need to load the dataset and tokenize the text in order to be fed to the model. Each model has its own associated tokenizer that we can retrieve by using the AutoTokenizer class.
def tokenize_function(examples):
    return tokenizer(examples["text"], padding="max_length", truncation=True, max_length=128)

dataset = load_dataset("emotion")
tokenizer = AutoTokenizer.from_pretrained(model_name)
tokenized_datasets = dataset.map(tokenize_function, batched=True)
The next step is to split the training from the testing data.
full_train_dataset = tokenized_datasets["train"]
full_eval_dataset = tokenized_datasets["test"]
If we have a GPU, it would be smart to set it up as the default training device. Otherwise, let's just use the CPU.
device = "cuda:0" if torch.cuda.is_available() else "cpu"
print(device)
Now, we can download the model and specify that we need it for a classification task with 6 classes. Then, let’s move the model on the device (GPU). To better understand how that works, you might be interested in reading the BERT paper.
Link to the paper: https://arxiv.org/abs/1810.04805
model = AutoModelForSequenceClassification.from_pretrained(model_name, num_labels=6)
model = model.to(device)
We should be capable of understanding how our model is doing on this task, which means that we need a way to evaluate it. It’s a classification task, so the evaluation method is quite easy. In this case, we can just rely on the accuracy metric so we can check the difference between the predicted labels and the real ones.
metric = load_metric("accuracy")

def compute_metrics(eval_pred):
    logits, labels = eval_pred
    predictions = np.argmax(logits, axis=-1)
    return metric.compute(predictions=predictions, references=labels)
The transformer library allows us to create a TrainingArguments object where we can specify the training hyperparameters like batch_size and learning_rate.
Then, pass these arguments to the Trainer together with the model and the data, and you’re ready to go.
training_args = TrainingArguments("test_trainer",
                                  per_device_train_batch_size=128,
                                  num_train_epochs=24,
                                  learning_rate=3e-05,
                                  evaluation_strategy="epoch")
trainer = Trainer(
    model=model,
    args=training_args,
    train_dataset=full_train_dataset,
    eval_dataset=full_eval_dataset,
    compute_metrics=compute_metrics,
)
Training might take a while, especially if you’re not using a GPU…
trainer.train()Great! Our model is now trained on the emotional data. How good is that, though? Let’s evaluate it!
trainer.evaluate()Accuracy is greater than 90%.
Now we can put both the tokenizer and the model into a pipeline so that we are able to classify new sentences.
pipeline = transformers.pipeline("text-classification",model=model,tokenizer=tokenizer)
pipeline("I am very mad!")
ONNX Conversion and Quantization
ONNX is an intermediary machine learning framework used to convert between different machine learning frameworks.
Let’s move the model back to the CPU.
model = model.to("cpu")With a single function, we can convert our developed PyTorch pipeline into an ONNX model.
The opset parameter specifies the version of the ONNX operator set to be used during the conversion from PyTorch to ONNX. The ONNX operator set defines the set of operations and their semantics that the ONNX model can use.
onnx_convert.convert_pytorch(pipeline, opset=11, output=Path("classifier.onnx"), use_external_format=False)We’re not done yet. We can still quantize our model. This means less precision in the weights representation, which makes the model smaller. In this case, I am using INT8 quantization.
quantize_dynamic("classifier.onnx", "classifier_int8.onnx",
                 weight_type=QuantType.QUInt8)
To use the ONNX models, you need you create a session. So I am instantiating here a session for both unquantized and quantized models.
session = ort.InferenceSession("classifier.onnx")
session_int8 = ort.InferenceSession("classifier_int8.onnx")
Let’s define a function to run the prediction on a single sentence by tokenizing the input sentence and running inference with the ONNX session.
def predict_sentece(sentence:str):

  # Tokenize and preprocess the input sentence
  tokens = tokenizer(sentence, return_tensors='np', padding=True, truncation=True)

  # Create the input_data dictionary
  input_data = {
      'input_ids': tokens['input_ids'],
      'attention_mask': tokens['attention_mask'],
      'token_type_ids': tokens['token_type_ids'],
  }

  # Run inference
  output = session.run(None, input_data)

  return np.argmax(output[0], axis=-1)


predict_sentece("I Love Python")
An input feed always looks like the following. You can read more about it here: https://huggingface.co/learn/nlp-course/chapter2/4?fw=pt
We have this data structure already ready because the downloaded dataset had this particular format. We can then exploit it for evaluation.
input_feed = {
    "input_ids": np.array(full_eval_dataset['input_ids']),
    "attention_mask": np.array(full_eval_dataset['attention_mask']),
    "token_type_ids": np.array(full_eval_dataset['token_type_ids'])
}
Let’s run the models and get the output with the help of the numpy argmax function.
out = session.run(input_feed=input_feed,output_names=['output_0'])[0]
out_int8 = session_int8.run(input_feed=input_feed,output_names=['output_0'])[0]
predictions = np.argmax(out, axis=-1)
predictions_int8 = np.argmax(out_int8, axis=-1)Let’s check to be sure that the accuracy of the predicted outputs using the converted ONNX model is still high.
metric.compute(predictions=predictions, references=full_eval_dataset['label'])Same thing with the quantized model. You will notice that our quantized model, is lighter for sure, but its accuracy decreases by 10 points.
metric.compute(predictions=predictions_int8, references=full_eval_dataset['label'])If you are using Colab, you can download the two ONNX models by using this function.
files.download('classifier_int8.onnx')
files.download('classifier.onnx')
Deploy on a Streamlit Web App
Now that we have downloaded the two model files, we can use one to develop our sentiment classification app.
I am not a good front-end developer, so when I need to create fast prototypes, I like using tools like Streamlit or Gradio.
In a few lines of Python code, we can set up this app easily.
In the following code we:
- set up the session runtime ONNX
- set up the tokenizer
- create a dictionary to map the predicted classes to the real emotions
- reuse the prediction function we developed earlier
- set up a simple UI where the user can insert a prompt and run the model with a button.
import streamlit as st
from transformers import pipeline
import onnxruntime as ort
import numpy as np
from transformers import AutoTokenizer

session = ort.InferenceSession("classifier.onnx")
model_name = "microsoft/xtremedistil-l6-h256-uncased"
tokenizer = AutoTokenizer.from_pretrained(model_name)


decode_sentiment = {
    0: "sadness",
    1: "joy",
    2: "love",
    3: "anger",
    4: "fear",
    5: "surprise",
}


def predict_sentece(sentence: str):
    # Tokenize and preprocess the input sentence
    tokens = tokenizer(sentence, return_tensors="np", padding=True, truncation=True)

    # Create the input_data dictionary
    input_data = {
        "input_ids": tokens["input_ids"],
        "attention_mask": tokens["attention_mask"],
        "token_type_ids": tokens["token_type_ids"],
    }

    # Run inference
    output = session.run(None, input_data)

    return np.argmax(output[0], axis=-1)


# Streamlit app
def main():
    st.title("Sentiment Classification App with BERT")

    # User input
    user_input = st.text_area("Enter your text here:")

    # Make prediction when the user clicks the button
    if st.button("Predict Sentiment"):
        if user_input:
            # Perform sentiment prediction
            sentiment = predict_sentece(user_input)[0]

            # Display the result
            st.success(f"Sentiment: {decode_sentiment[sentiment]}")
        else:
            st.warning("Please enter a text for sentiment prediction.")


if __name__ == "__main__":
    main()
The result should look something like the following.
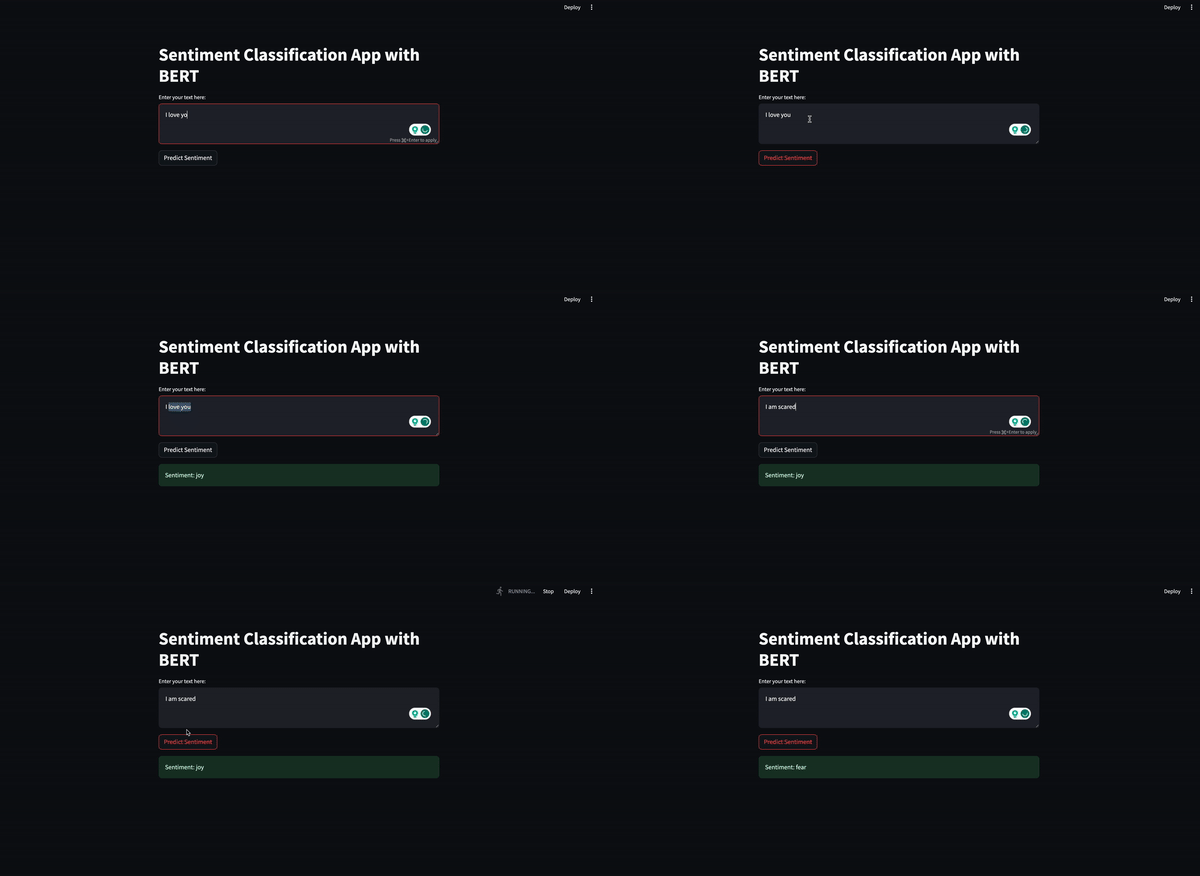
Conclusions
In this article, where we implemented a small full-stack app, we saw how to train a model, how to optimize it using quantization, and how to create a simple frontend prototype using Streamlit.
One interesting thing to know about ONNX is that it is a format that can be converted to many other frameworks. So if you want to then convert it back using Tensorflow, for example, it’s very easy to do.
If you are interested in this article, follow me on Medium! 😁
💼 Linkedin ️| 🐦 Twitter | 💻 Website
This article has been published on Towards AI